
Many winter storage crops love high humidity and low temperatures. Others like low humidity and warmer temperatures. It can be a real challenge to achieve the right balance. As we make air cooler, it holds less water vapor so the difference between high humidity and condensation (rain) becomes less and less. So, it is not uncommon to run into either overly dry conditions or condensation on walls and ceilings. What’s going on here? And what can we do about it?
Where is the Water Coming From or Going To?
When I’m troubleshooting humidity or condensation issues with growers, I always start by trying to understand how the water is moving. The questions I ask are:
- What is the source of the water vapor in air?
- Is there any chance this is water leakage from rain, snow melt, ground water, or plumbing?
- Is this moisture coming from the air inside the cooler or is this the result of warmer, more humid air infiltrating into the cooler somehow?
- Is the water coming from stored produce as a result of respiration? Is it a blocked evaporator drain?

Condensation
Start by remembering that air carries water vapor and the cooler it gets, the greater the chance of that water vapor dropping out as condensation. Also imagine a glass of ice water on a warm humid day. The condensation on the outside of that glass is water vapor that has condensed out of the air when it came into contact with the cold surface of the glass. In technical terms, the surface of the glass is below the dew point of the air, so dew (condensation) is formed.
Your cooler walls, floors and ceilings can also end up doing the same thing as that glass of ice water. I’m going to just refer to cooler walls, floors, and ceilings collectively as “walls” from now on for simplicity. If the cooler walls are relatively cold and there is stored produce nearby that is respiring and generating heat and water vapor, it’s the same situation as that glass of ice water on a humid day. You have a relatively warm and humid air source coming up against a cold surface. Condensation will happen. Congrats, you made rain!
Deep Winter Storage… “Why am I getting condensation all of a sudden?”
As we move into deeper winter storage periods, cooler refrigeration systems are generally running less. The outside temperatures are closer to storage temperature, so there is less need for refrigeration. Most farms are also slowing down on their pack-out frequency.
Two things happen:
- the evaporator is running less and therefore taking less water out of the cooler room air – so humidity increases and
- there are fewer door openings and maybe even shorter periods of door openings which results in less ventilation of the cooler – so humidity increases.
Condensation Cures
Here are some things to try if you are seeing condensation:
- Circulation – Put a small fan in the room to circulate the air. If you’ve got a packed cooler with stacks of storage crops, you’re likely to have areas of very low air flow or even no air flow. A fan will stir the room air up and make sure the air, the wall surfaces, and the produce are relatively close in temperature. This helps minimize condensation by equalizing the temperatures. Learn more about using fans and blowers in our post about warm rooms and freeze protection.
- Ventilation – Try cracking the door slightly or otherwise providing some ventilation of the cooler using cold, dry, outside air. This could be something you do for a few hours a day, or you may find you need to do it indefinitely. Keep an eye on it, that cold, dry, outside air can also freeze produce and can result if excessive drying. Be aware that open cooler doors can result in rodent and pest pressure, and you’ll want to manage that. If you want to get even more fancy, you can do a thermostatically controlled outside air exchange system. Learn more in our post about circulation and ventilation in high tunnels.
- Space – Keep produce off the floor and away from walls. This ensures there is room for air to flow between the relatively warm (respiring) produce and the relatively cool walls, floors and ceiling. This air flow helps prevent stagnation which can lead to condensation. Respiration is also temperature dependent. The larger the pile of produce, the hotter the center will be and the more it all will respire. So, consider giving stored produce some space to breathe and be cooled, especially as the stored volume diminishes over the winter.
- Bins – The right bin selection for storage crops makes a big difference. If you have very local condensation issues or are seeing molds and mildews on garlic or storage onions, consider a ventilated bin (with slats or holes on the side). These crops need lower humidity (70-80%) for long-term storage and open sides help with this.
- Dehumidifying – If you’re still having trouble, you’re going to be tempted to put a dehumidifier in the cooler. You can do that, but a simpler and cheaper approach would be a small heater. A dehumidifier is just a combination of a refrigeration system and a heater. The added heat will result in warm air that can carry more moisture and it will also trigger the refrigeration system to run which will take the moisture out of the air.
- Gutters – If you have a condensation problem that just can’t be resolved, you should consider catching and dripping condensation and directing it away from produce, food contact surfaces, and people using gutters. Cold water lines are a common area where dripping condensation occurs. Solid, well-sealed insulation can help prevent condensation and routing lines away from areas directly over produce, food contact surfaces and people can minimize produce safety risk.
On the Other Hand… “I can’t keep my humidity high enough!”
Some growers also have a hard time keeping humidity high enough. This is generally the result of either poor cooler sealing, running with very low refrigerant temperatures, or having relatively little produce in a large cooler.
Humidity Helpers
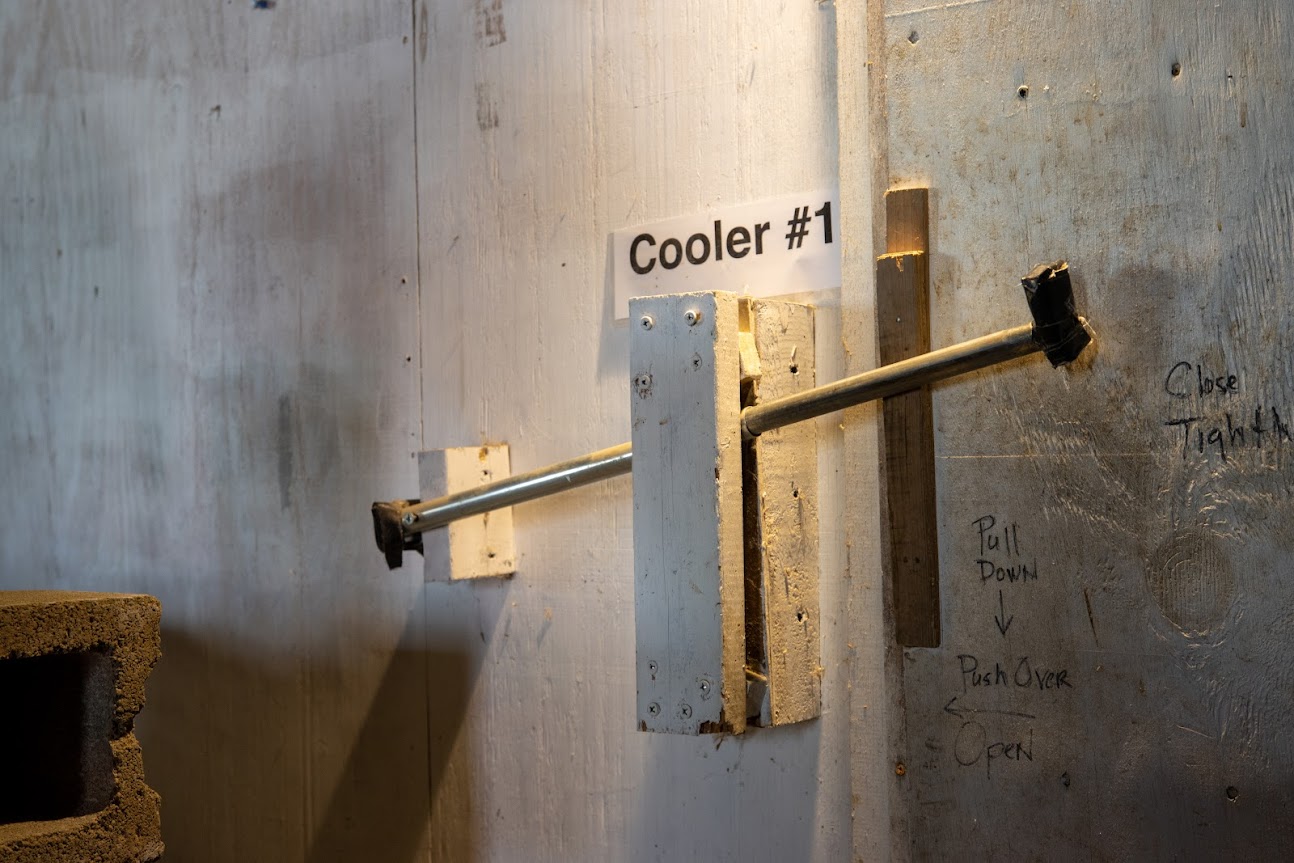
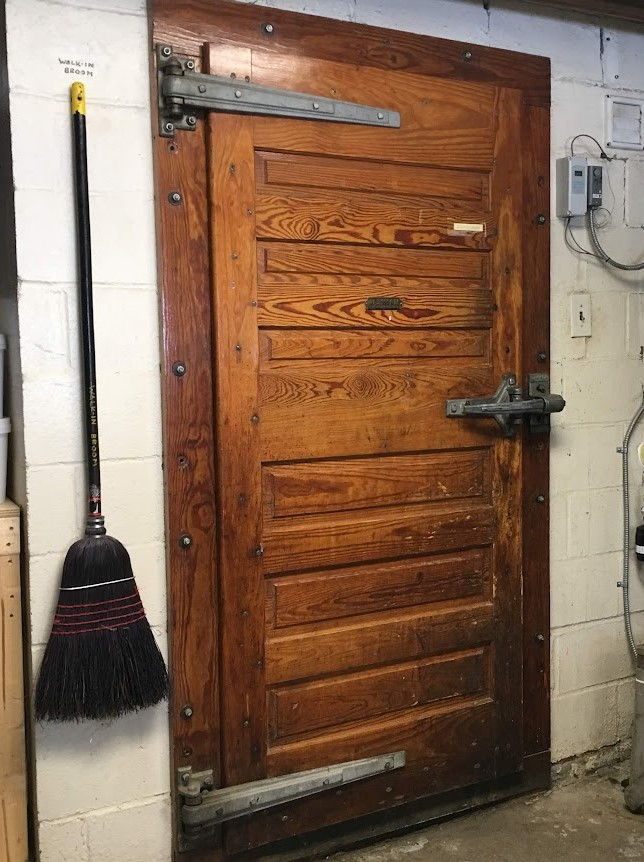
- Sealing – Cooler sealing is important to prevent infiltration of relatively dry winter air into the cooler you’re trying to keep humid. Go inside the cooler on a bright, sunny day. Close the door with the lights off. Look for daylight all around. If you find any, it’s a leakage source and should be filled with caulk (small cracks) or spray foam (larger cracks). Look especially at the door and CoolBot opening. Did you mean to spray foam the CoolBot after it was installed and never quite get to it? Do it now. Is the door well sealed with weather stripping or other seals? Is there a worn-out door sweep on the bottom of the door? Is there a threshold that allows for the bottom of the door to seal well? Does the latch help ensure the door is truly closed and sealed?
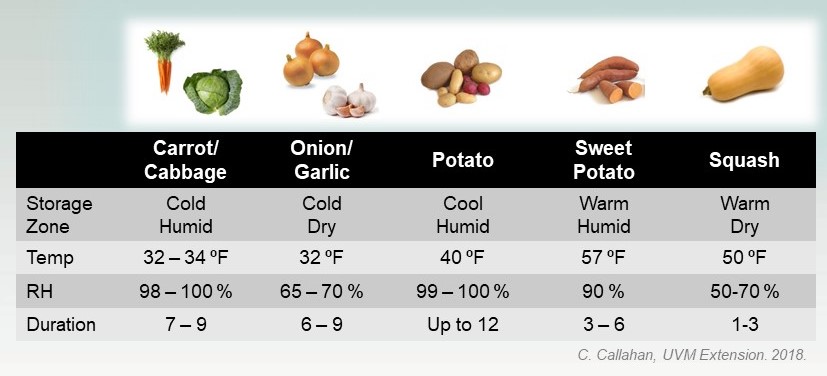
- Bins – The right bin selection for the specific storage crop can make a big difference. Root crops such as potatoes, carrots, beets, turnips, and sweet potatoes prefer very high humidity around 95-98%.
- Refrigeration and Evaporator Temperature – The temperature of the actual refrigerant running through your cooling equipment is what sets the minimum temperature and minimum humidity in the room. It’s the glass of ice water. CoolBots tend to run with relatively warm refrigerant temperatures and any drying out that happens is the result of something else. Split refrigeration systems with condenser/compressors outside and evaporators/expansion valve inside are more prone to running with excessively low refrigerant temperatures. This is a bit in the weeds, but the expansion valve sets the refrigerant pressure (compressor suction pressure) which sets the evaporator temperature. These are adjustable and are set by the refrigeration technician. They are often set low to ensure there is capacity to cool in the summer and remove field heat at the height of harvest. Or they are set low because dairy milk cooling, restaurant walk-ins, and grocery store coolers have less humidity sensitivity. They also have more door openings. Since the majority of the refrigeration industry is not sensitive to humidity, the default is often applied on farms inadvertently. Have a conversation with your refrigeration contractor about either seasonally bumping up your evaporator temperature to increase humidity, working on a two expansion valve setup (winter and summer) switched with a valve, or explore a larger evaporator (sometimes referred to as a low velocity or high humidity evaporator).
- Adding Humidity – You’re going to be tempted to add water somehow. I get it. But, try not to. Spraying water on the floor of the cooler makes a mess and can support growth of plant and human pathogens. Spraying water directly on crops or covering bins with moistened burlap or cloth introduces a new food contact surface which needs to be managed (cleaned and sanitized as appropriate). This can also lead to molds, mildews and rot. Adding liquid water is not the same as adding humidity; remember cold air can only take up so much humidity. Adding humidifiers seems like a good idea, but they clog and leak in my experience and simply lead to a mess of pooled liquid water on the floor or whatever is underneath the humidifier (including produce). If you decide to add humidity with a humidifier, be sure to include a good filter in the feed line and consider a humidifier that evaporates water into the air instead of spraying liquid water as droplets.

Specific Storage Crop Issues
It’s important to remember that different storage crops have different optimal storage conditions (temperature and relative humidity (RH)).
This tends to lead us to wanting different storage zones for the different crops being stored. That doesn’t necessarily mean different storage rooms or coolers. I’ve been in an 8’x10’ cooler with a CoolBot that had a 10 °F temperature difference and a 20% humidity difference between the CoolBot (cold and dry) and the door (warmer and more humid) over the 10’ length.
The key is
(1) knowing the best conditions for storage of specific crops and
(2) knowing your actual conditions.
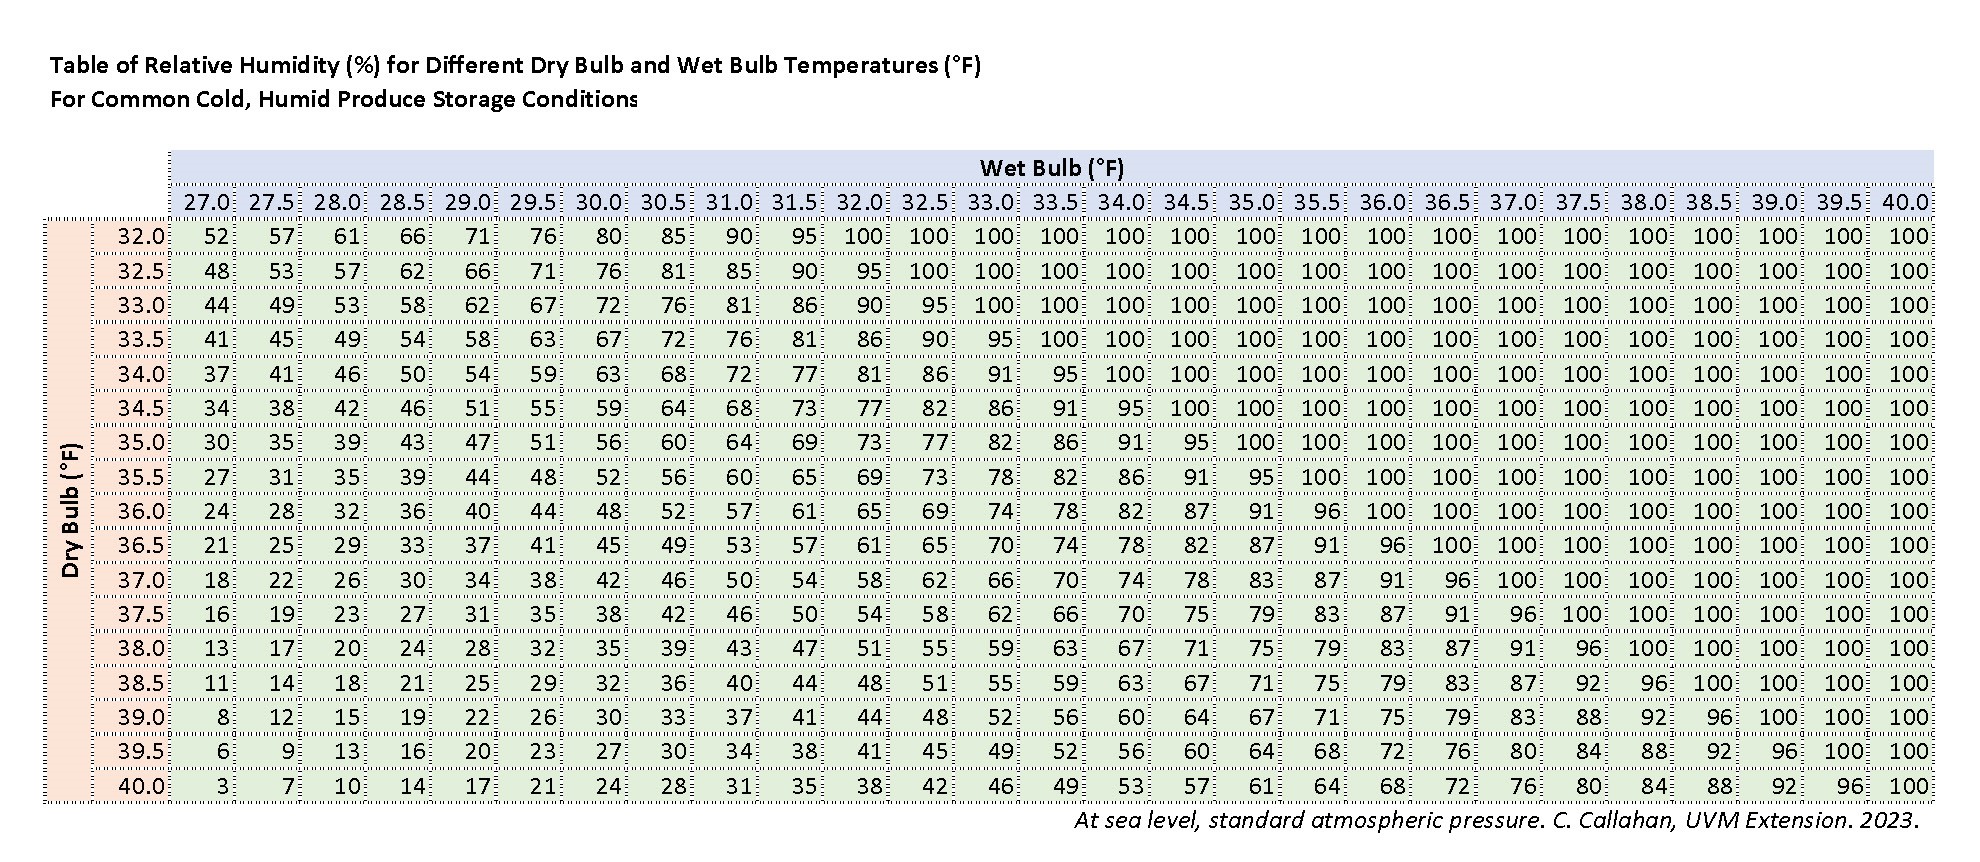
Invest in a good, instant read, digital thermometer that can be calibrated in a glass of ice water. You can use these or other remote monitoring options to know how the conditions in your cooler differ by location. Electronic humidity sensors are notoriously inaccurate above 85% RH, so invest in a sling psychrometer which will give you dry-bulb and wet-bulb temperatures. These two temperatures determine relative humidity and you can either use a look-up table that comes with the psychrometer or use an online calculator. You can also download an Excel add-in if you’re really serious. Or use the lookup table below for common cold, humid produce storage conditions.
A word of caution, don’t actually spin (or sling) the glass psychrometer in your cooler, use the air flow that a fan provides. The glass thermometers can break and then you’ve got bigger problems. You can also make a psychrometer out of your digital thermometer by placing some moist cotton shoelace over it and putting it in the air flow to measure wet-bulb temperature.
The Condensation You Can’t See, Until It’s too Late.
Condensation isn’t always obvious. It can happen inside walls, ceilings, and below floors as well. If you’re keeping the inside of the cooler cold and the air on the other side of any of those walls is relatively warm and humid, guess what? There’s a chance of condensation inside the wall, ceiling or floor.
When there is a temperature difference across any constructed wall (again, “walls” means ceilings and floors also), there is a temperature gradient. There is also generally going to be a dew point gradient. The dew point gradient results in a “moisture drive.” Think of it as pressure; there is higher moisture pressure on one side and it drives the moisture toward the other side. This can occur by diffusion (water vapor moving from an area of high concentration to one of lower concentration) or by infiltration (air leaking into and even through a wall.)
The warm humid air can infiltrate into the wall and water vapor can diffuse into a wall if there is no barrier to this movement. That’s the role of a vapor or moisture barrier. The other challenge, in the northeast anyway, is that our dew point gradients can swap over the course of the year.

The figure above shows a cooler wall in summer conditions and winter conditions. The basic wall construction from inside to outside is a layer of dairy board (FRP), ½” plywood, 4” of rigid blue board, and a final outside layer of ½” plywood. The inside conditions are the same year-round at 34 °F and 95% RH (the resulting dew point temperature is 32.2 °F). In the summer, the outside conditions are 90 °F and 85% RH (dew point is 84.6 °F). So the moisture drive is from the outside (higher dew point) to the inside (lower dew point). We need a vapor barrier on the outside. In the winter, the outside conditions are 32 °F and 40% RH (10.4 °F dew point). The moisture drive is from the inside (higher dew point) to the outside (lower dew point).
So, we need a vapor barrier on the inside. Cooler walls should, therefore have vapor barriers on both inside and outside wall surfaces and be well sealed all around. Alternatively, a wall can be constructed to ensure areas where condensation will happen are ventilated. An intentional air gap can be designed into the wall which spans the condensation plane and which has an inlet on the bottom and an outlet on the top. This would allow for condensation that does occur to be stripped with passive, natural convective flow. In either case, a fair amount of construction skill is required.
Want to geek out on cooler walls and condensation, check out our wall thermal calculator. Want to geek out more, call or email Chris.
A video presentation on this topic is also available here:
Share this post easily with this short link: http://go.uvm.edu/humidity
Acknowledgements
This resource was developed as part of the Food Safety Outreach Program under grant number 2020-70020-33003 from the USDA National Institute of Food and Agriculture and also funded, in part, by the USDA Northeast Sustainable Agriculture Research and Education program through award LNE19-375 and by the Food and Drug Administration through The Vermont Agency of Agriculture Food and Markets via the Integrated Extension Educational Programming in Support of the VAAFM Produce Program Grant 02200-FSMA-2018-01. The views expressed in the publication do not necessarily reflect the official policies of the U.S. Department of Agriculture, the U.S. Department of Health and Human Services or the Vermont Agency of Agriculture; nor does any mention of trade names, commercial practices, or organization imply endorsement by the United States Government or the State of Vermont. It is offered without regard to race, color, religion, sex, sexual orientation, gender identity, national origin, disability, protected veteran status, or any other category legally protected by federal or state law.” This project was supported by the Food and Drug Administration (FDA) of the U.S. Department of Health and Human Services (HHS) as part of a financial assistance award 02200-FSMA-24-01 totaling $30,000 with 100 percent funded by FDA/HHS. The contents are those of the author(s) and do not necessarily represent the official views of, nor an endorsement, by FDA/HHS, or the U.S. Government.